Question: Can You Create a Weather Science Experiment?
The study of weather affect every one of us each and every day. Convection, high and low pressure frameworks, dissipation; these things help decide whether our event will be rained out, or if we will have a sunny day to enjoy the outdoors. Learn more about the way weather works by doing these hands-on experimental projects.
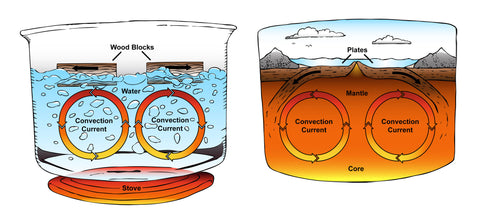
Project 1: Convection Current
Did you know, as air warms up, its particles extend and spread out, making the air thinner than it was before it was heated up. It glides up through the denser cool air above it. As the warm air rises it begins to chill and its atoms draw nearer together, making it sink once more. This flow is called convection, and the rising and falling of the air are called streams. Convection streams are a part of what causes various types of weather. You'll discover how this works in the following experiment.
Note: You should have a grown-up help you with the hot water and the sharp knife.
Materials Needed:
Water
Elastic (rubber) band
Plastic wrap
Knife
Food coloring
Small glass or receptacle (it needs to fit inside the Large glass or receptacle)
Large glass or receptacle
Procedure:
- Carefully fill the small glass or receptacle with hot (bubbling) water and include a few drops of food coloring. Extend the plastic wrap gently over the glass and seal it with the elastic band. The plastic wrap will puff up; this is because the hot air over the water is growing.
- Fill the large glass full with cool water from the tap.
- Use a pair of tongs to set the glass of hot water in the base of the jug.
- Cut open the plastic wrap with the knife and watch what happens! One long slice ought to do it.
Project 2: Sea Breeze
Air appears like the lightest thing on the planet, yet it really pushes down on you and the ground with a lot of pressure. This pressure is called pneumatic force. Pneumatic force doesn't generally remain the same; meteorologists measure its progressions with a gauge. In the last experiment, we saw that when air warms up it starts to rise. When it rises, it doesn't push on the ground with as much weight. A territory loaded with light, warm air is known as a low pressure zone. The areas with cool, denser air are called high pressure zones.
Note: Have a grown-up help you with the oven and matches.


Materials Needed:
Cardboard box
Candle
Sand
Two metal pans
Ice
Procedure:
- Set up the project in a place where it will be shielded from drafts. If necessary, you can make a three sided screen by cutting off one side of a cardboard box.
- Empty some sand into one of the pans and place it in the oven to warm it up. Set temperature to 300 degrees for about 5-8 minutes.
- While the sand is warming up, light a candle and after that blow it out. In which direction does the smoke flow? If you have shielded your experiment area from drafts, it should flow straight up like your convection current.
- Fill the second pan to the brim with ice. Put the pan of hot sand and the pan of ice next to each other. Now set the hot pan on the pot holder.
- Light the candle again and blow it out, then hold it in the middle of the two pans, ideally over the edge of the ice pan. In which direction does the smoke flow?
Project 3: Evaporation Station
The low pressure zones make mist on the ground as the rising hot air conveys dampness with it. The dampness is as a gas called water vapor. At the point when the water vapor cools, it forms water beads that consolidate to shape mist. How does the water vapor get into the air in the first place? A large portion of it originates from dissipation. Dissipation happens when water particles warm up; they increase enough vitality to transform from a fluid into a gas, and afterward they ascend into the air to be carried on rising convection streams. You have witnessed this in your kitchen when steam ascends from hot bubbling water.
Are there variables that can change how quick water vanishes? You can discover it by setting up an experiment to test the impact of wind, temperature and surface zone on the rate of vanishing. The accompanying strategy will give you the essentials, yet don't hesitate to think of your own techniques for testing and measuring the outcomes.
Materials Needed:
Lamp
Pie pan or a shallow dish
Two kitchen sponges (sponges should be similar size)
Small glass
Electric fan
Procedure:
1. Test the impact of temperature utilizing a lamp to give warmth. Put two kitchen sponges on the plates and pour about 1/8 cup of water over each of them. depending upon the size of the sponge, you may need to use more water. Use enough to get the sponge wet completely through. Place one of the sponges directly under the lamp and the other at room temperature out of direct daylight. Watch the sponges at exact intervals of time, and lessen the time between viewings as they get closer to drying. Record how much time it took each of the sponges to dry completely.
2. Test the impact of wind by using an electric fan. Dampen the sponges as you did in step 1. Set one sponge about 12 inches from the electric fan and turn the fan on. Set the other sponge some place out of the draft. Watch the sponges at exact intervals of time. Record how much time it took each of the sponges to dry completely. Which one dried quicker? Did the sponge in the fan dry quicker than the one under the lamp in step 1?
3. Now test the impact of more or less surface region. Pour about 1/8 cup of water into a small glass. Locate the surface zone of the water in the cup using the equation π r 2 (π = 3.14, r = radius. Discover this by measuring the diameter of the cup and dividing this by two). Pour about 1/8 cup of water into a pie pan or wide shallow dish. Measure the surface area of the water in this container. Set the cup and the pan on the counter and check them a couple times each day. Which water dissipates quicker? The water with the tiny surface area or the expansive surface area?


